EXCEL 2013 – User Guide
EXCEL 2013 – GETTING STARTED Reference Guide
Excel 2013 - Getting Started
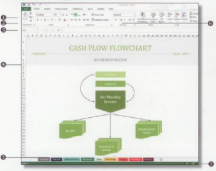
The Excel Window
- Quick Access Toolbar - contains shortcuts for the most commonly used tools.
- Backstage View – contains tools to work with workbook files and manage Excel settings.
- Ribbon – contains groups of tools for use with the Excel 2013.
- Worksheet Area – displays the current worksheet.
- Sheet Tabs – displays tabs for the sheets in the current workbook.
- Tab Bar – contains tabs that display tools and commands in the ribbon.
- Status Bar – contains worksheet information and shortcuts.
Customizing the Ribbon
To optimize Excel for the tools and features you use most, you can customize the toolbars and ribbon.
∙ To customize the Quick Access Toolbar, click the Customize Quick Access Toolbar button in the top right corner of the toolbar.
Check or uncheck commands from the resulting menu to add or remove shortcuts.
∙ To hide the Ribbon, Click the Customize the Ribbon button in the top right corner of the screen. Click Auto-Hide Ribbon to hide the entire ribbon. Click Show Tabs to only show the ribbon’s tab headings. Click Show Tabs and Commands to restore the ribbon again once you have hidden it.
Using the Backstage View
The Backstage view replaces and expands on the File menu. The Backstage view allows you to quickly manage Excel settings as, functions, and options. To access the Backstage view, click on the File tab on the Tab Bar. Make selections in the Left pane. Click the Back button to exit.
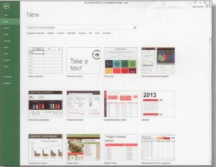
Creating a New Workbook
1. Click on the File tab
2. Select New in the left pane. From here, you can do one of the following from the Available Templates pane:
∙ To select a blank workbook, select Blank workbook.
∙ To use a default template, scroll through listed templates.
∙ To look through commonly searched template, click the options in the Suggested searches spaces.
∙ To search the web for a template, click in the Search for online templates bar. Enter your search query and click the Search button.
Opening a Workbook
- Click on the File tab.
- Select Open in the left pane.
- Select the location where your file is stored from Recent Workbooks or your Computer.
- Click the Browse button. Select the workbook file
- Click Open.
Saving a Workbook
1. Click on the File tab.
2. Do one of the following:
∙ To save the document as an Excel 2013 file (.xls), Save from the left pane.
∙ To save the document as another file format, select Save As in the left pane. Select the location you would like to save the file to and click Browse. Click the arrow on the Save as type box and select a format from the resulting menu.
3. Select the location where you want to save the workbook.
4. Enter a file name in the File name box.
5. Click the Save button.
Worksheets
Inserting a Worksheet
∙ To insert a new worksheet at the end of existing worksheets, click the Insert Worksheet button on the right side of the row of worksheet tabs.
∙ To insert a new worksheet before an existing worksheet, select the worksheet and click on the Home tab. Click the arrow on the Insert Cells button in the Cells group and select Insert Sheet from the resulting menu.
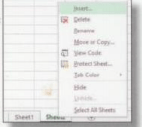
Renaming a Worksheet
- Right click the tab for the worksheet you want to
- rename.
- Select Rename from the short cut menu.
- Enter a name for the worksheet and press the Enter key.
Moving or copying a Worksheet.
1. Right click the tab for the worksheet you want to move or copy.
2. Select Move or Copy from the shortcut menu.
Select the worksheet you want to move or copy.
3. Do one of the following:
∙ To copy the selected worksheet, check the
Create a copy box.
∙ To move the selected worksheet, clear the
Create a copy box.
4. Click the OK button.
Deleting a Worksheet
1. Select the worksheet you want to delete.
2. Click on the Home tab.
3. 3. Click the arrow on the Delete
button in the Cells group.
4. Select Delete Sheet from the resulting menu.
Rows & Columns
Inserting a Rows or Column
1. Select the row heading below or the column hearing to the right of where you want to insert the row or column. (To insert multiple rows or columns, elect the same number of columns or rows that you want to insert.)
2. Click on the Home tab.
3. Click the arrow on the Insert Cells button in the Cells group.
4. Select Insert Sheet Rows or Insert Sheet Columns from the resulting menu.
Cells
Selecting Cells
∙ To select a single cell, click on the cell.
∙ To select a range of cells, click on the first cell in the range, hold the Shift key, and click on the last cell in the range, or click and drag the mouse pointer over the range of cells.
∙ To select multiple
nonadjacent cells, hold the Ctrl key and click on each cell you want to select.
∙ To select all the cells in a worksheet, click the Select
All button in the upper left corner of the worksheet.
Inserting Cells
- Select the cell or range of cells where you want to insert the new blank cells.
- Click on the Home tab.
- Click the arrow on the Insert Cells button in the Cells group.
- Select Insert Cells from the resulting menu.
- Select how you want to shift the cells and click the OK button.
Formatting Cells
- Select the cells you want to change the formatting for.
- Click the Home tab.
- Click the Format button in the Cells group.
- Select Format Cells from the resulting menu.
- Make formatting selections in the Format Cells dialog box. 6. Click the OK button when you are finished.
Merging Cells
Merge cells to spread the contents of one cell over several cells.
- Copy the data into the upper left cell of the range.
- Select the cells you want to merge.
- Click on the Home tab. 4. Click the arrow on the Merge & Center button in the
Alignment group and do one of the following:
∙ To merge the cells and center the text, select
Merge & Center from the resulting menu.
∙ To merge without centering, select Merge
Across or Merge Cells
from the resulting menu.
Data
Enter data into cells by double-clicking until the flashing text cursor appears. You can also use the Copy and Paste functions to input large amounts of data.
Using Auto Fill
Excel can automatically fill in a series of numbers, dates, or other sequential items.
- Select the first cell in the range you want to fill.
- Enter the starting value
- Enter a value in the next cell to establish a pattern.
- Select the cell or cells that contain the starting values.
- Drag the fill handle over the range you want to fill. To fill in a numerically increasing order, drag down or to the right.
Clearing Cell Format or Contents
- Select the cells you want to clear of formatting or contents.
- Click on the Home tab.
- Click the Clear button in the Editing group.
- Select one of the following from the resulting menu:
∙ To clear everything in the cells, select Clear All.
∙ To clear the formatting of the cell, select Clear
Formats.
∙ To clear the contents of the cell, select Clear Contents.
Formulas
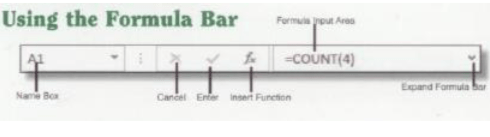
Creating a Formula
- Select the cell that will contain the formula.
- Enter an equal sign (=) in the Formula Input Area.
- Enter the formula in the Formula Input Area using the following guidelines:
∙ The four types of operators are Add (+),
Subtract (-), Multiply (*),
and Divide (/).
∙ Reference cells by their cell number (i.e. Al, B8).
∙ Enter parentheses around calculations that are to be performed first.
Inserting a Function
1. Select the cell that will contain the formula.
2. Click the Insert Function button on the Formula Bar.
(You can also click on the Formulas tab and click the Insert Function button in the Function Library group.)
3. Do one of the following:
∙ To search for a function, enter a description of the function in the Search for a function box and click the Go button.
∙ To select a category, click the arrow on the Or select a category box and select a category from the resulting menu.
4. Select the function you want to use and click the OK button.
5. Enter the arguments for the function in the Function
Arguments dialog box.
(Arguments are the values that a function uses to perform a calculation or operation.)
6. Click the OK button when you are finished.
Using the Sum Button
- Click a cell below the column or to the right of the row of numbers you want to evaluate.
- Click on the Home tab.
- Click the arrow on the Sum button in the Editing group.
- 4. Select a function from the resulting menu.
- Do one of the following:
∙ To use the highlighted cells, press the Enter key.
∙ To change the highlighted cells, select other cells and press the Enter key.
Understanding Cell References
∙ A reference identifies a cell or range of cells on a worksheet and tells the formula where to look for data.
∙ A relative cell reference is relative to the position of the formula. If the position of the cell that contains the formula changes, the reference is changed.
∙ An absolute cell reference always refers to a specific location,
regardless of where the formula is located. To indicate an absolute reference, place a dollar sign ($) before the letter and number of the cell reference, such as $B$2.
Illustrations
Inserting an Illustration
1. Click on the workbook where you want to place the illustration. 2. Click on the Insert tab.
3. In the Illustrations group, do one of the following:
∙ To insert a picture from a file, click the Picture
button. Locate and select
the graphic file you want
to insert and click the
Insert button.
∙ To insert a graphic or clip art from the internet, click
the Online Pictures
button. Enter a keyword
for the clip are you want to
insert in the Search for box
in the Clip Art task pane.
Click the Enter button.
Click on the graphic you
want to insert in the
resulting pane.
∙ To insert a shape, click the Shapes button and select a shape from the
resulting menu. Click and drag in the worksheet to create the shape.
∙ To insert a SmartArt graphic, Click the Smart Art button. Select a category in the left pane and select the SmartArt graphic you want to insert. Click the OK button.
Using Quick Analysis
The Quick Analysis feature provides instant links to powerful tools to analyze your data through a chart, formula, sparkline, or other graphical representation.
1. Click and drag to select the table you wish to work with.
2. When the Quick Analysis button arrears, click it to open the Quick
Analysis menu.
3. Click on a button to apply that feature to your
workbook.
Views
Changing the Workbook View
1. Click on the View tab.
2. In the Workbook Views group, do one of the following:
∙ To view the workbook in
Normal view, click the
Normal View button.
(Normal is the default
view.)
∙ To view and adjust page
breaks, click the Page
Break Preview button.
(Click the Normal View
button to return to the
default views.)
∙ To view a workbook as it
will look when it is
printed, click the Page
Layout View button.
Viewing Multiple Workbooks
- Open the workbooks you want to view.
- Click on the View tab
- Click the Arrange All button in the Window group.
- Make a selection in the Arrange section.
- Click the OK button
Splitting Panes
Split pane to view two part of a worksheet at once.
- Click on the View tab
- Click the Split button in the Windows group.
- Click and drag the split bars into the positions you want.
- To remove the split, click the Split button in the Window group.
Comparing Workbooks Side by Side
You can use workbooks side by side to avoid having to switch between
windows.
- Open the workbooks you want to view.
- Click on the View tab.
- Click the View Side by Side button in the Window group.
- Optional: To enable synchronous scrolling between the two windows, click the Synchronous Scrolling Button.
Click the OK button